Infrastructure (AWS)
This is a document for building the RISKEN system on AWS.
In this document, we assume a large-scale environment where RISKEN scans the equivalent of hundreds of projects. If you are operating in a smaller environment that does not fall under this category, please refer to Installation on Local Machine. (It is possible to start with a single instance configuration using docker compose.)
Goal
The final configuration that will be created is as follows:
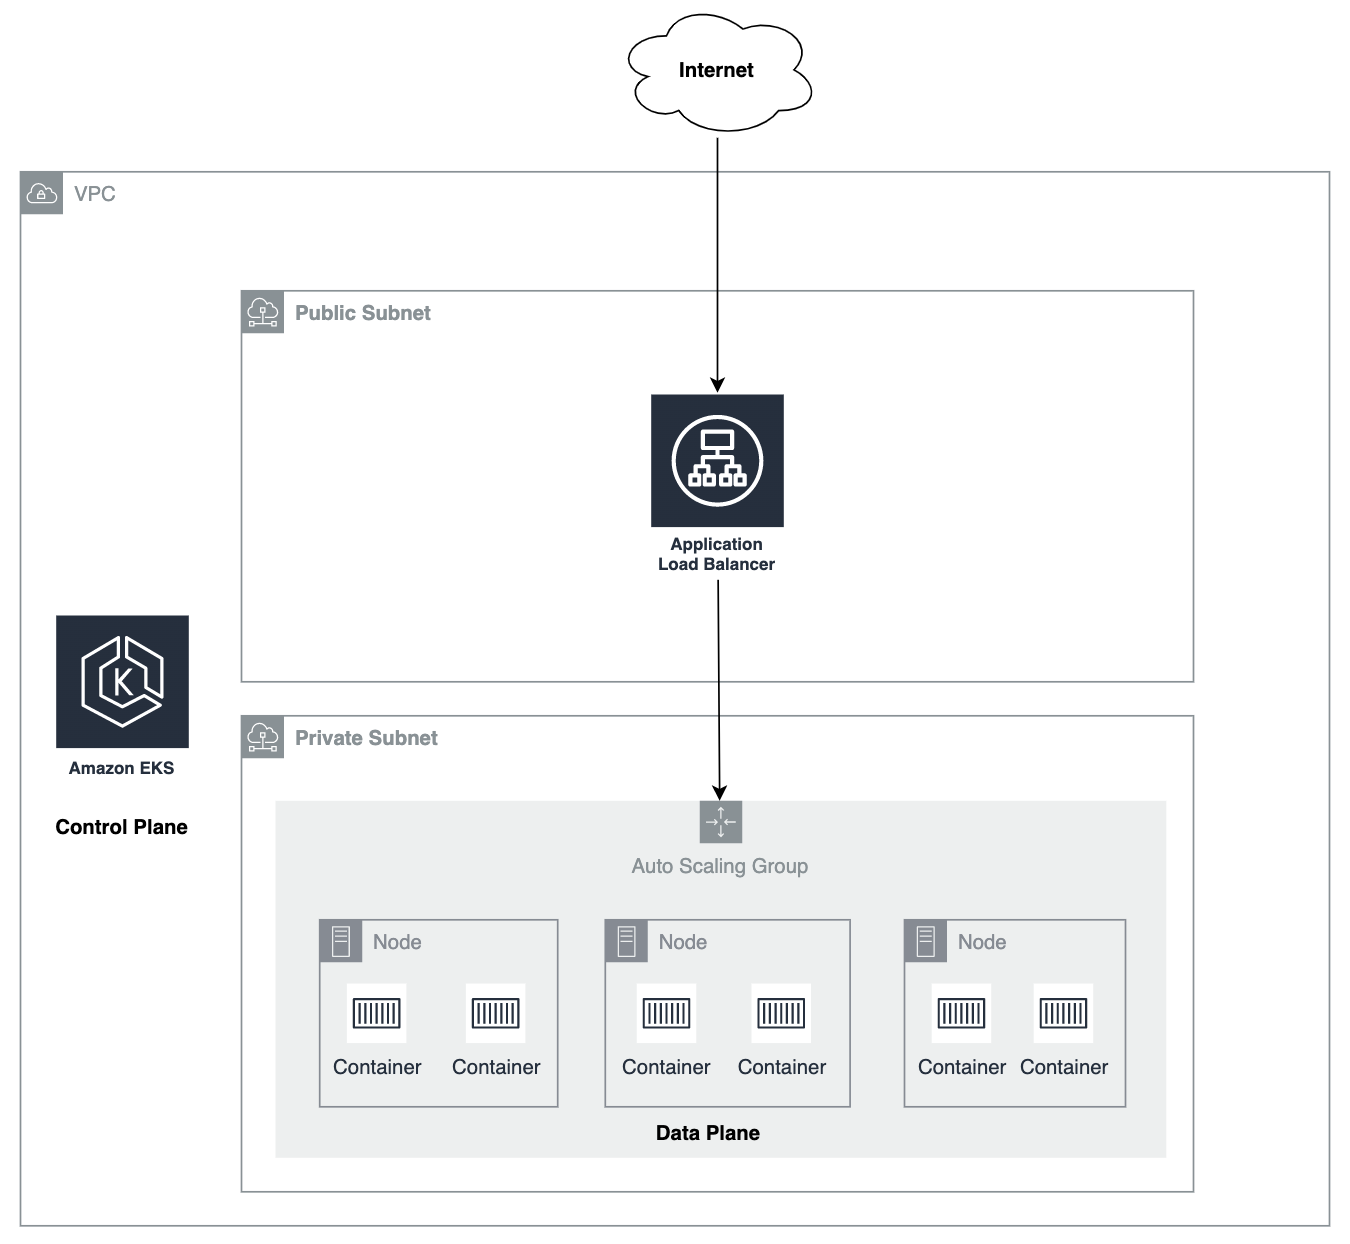
- The system will have a
Public Subnetand aPrivate Subnetwithin an AWS VPC.- The Public Subnet is an internet-facing network where ALB will be deployed.
- The EKS node will be located in the Private Subnet. Specific ports will be allowed from ALB.
- The RISKEN container application will be deployed on EKS.
- This is the simplest architecture image.
- It is possible to integrate with AWS services such as Cognito, Route53, ACM, RDS, SQS, ParameterStore, and KMS, but they are not included in this diagram to keep the explanation simple.
Preparation
The following items are necessary to build RISKEN on AWS.
- About the AWS environment
- In this document, an example of configuration in the following AWS environment is described (changes to the procedure will be necessary where it does not apply).
- Region:
ap-northeast-1 - EKS Version: 1.21+
- Region:
- In this document, an example of configuration in the following AWS environment is described (changes to the procedure will be necessary where it does not apply).
- An IdP that supports OIDC
- RISKEN's user authentication will be integrated with an external IdP.
- Please refer to the AWS ELB documentation for details on the authentication flow.
- Installation of various CLI tools
Create an EKS Cluster
Create a new cluster
First, you need to create an EKS cluster.
- Follow the EKS documentation to create a cluster.
- The following is an example of cluster configuration (especially security-related settings should be changed according to the team's policy):
- Cluster configuration
    - Kubernetes Version: 1.21
    - Cluster Service Role: A role with AmazonEKSClusterPolicy set.
- Networking: Configured according to the environment.
- Cluster Endpoint Access: Public & Private
    - Advanced Setting: It is recommended to set IP address restrictions for access from the public to the master API.
- Control Plane Logging: All enabled
- Others: Default values
Adding a NodeGroup
After creating a cluster, the next step is to add a NodeGroup.
- Please follow the instructions in Adding Managed NodeGroups .
- IAM Role to be set for the NodeGroup:
- In the trust relationships settings, allow actions from the EC2 service as follows:
{ "Version": "2012-10-17", "Statement": [ { "Effect": "Allow", "Principal": { "Service": "ec2.amazonaws.com" }, "Action": [ "sts:AssumeRoleWithWebIdentity", "sts:AssumeRole" ] } ] } - Also, please add the following managed policies:
- AmazonSQSFullAccess
- AmazonEKSWorkerNodePolicy
- AmazonEC2ContainerRegistryReadOnly
- AWSXRayDaemonWriteAccess
- AmazonSSMManagedInstanceCore
- CloudWatchLogsFullAccess
- AmazonSSMReadOnlyAccess
- AmazonEKS_CNI_Policy
- In the trust relationships settings, allow actions from the EC2 service as follows:
- Please select the following instance types in this document:
- AMI type: `Amazon Linux 2 (AL2_x86_64)`
- Instance type: `t3.medium`
- Number of instances (Min): 2
I want to use Fargate or Graviton2 type nodes.
- RISKEN works with other node types as well, but this document provides an example of the above nodes to simplify the process.
- Using Fargate or other node types may affect observability related to resource constraints and logging.
- For details, see EKS Node .
- Some container images for certain components (such as DB or Queue) are not compatible with multi-architecture CPUs.
- If running on an ARM64 architecture like Graviton2, you will need to build the above components using AWS managed services. (For more details, see the Options page.)
Creating an ALB
Create an Application Load Balancer (ALB) as an endpoint to accept requests from the internet.
Create Target Groups
First, create two target groups that will serve as routing destinations for the ALB:
-
Target group for the API:
- Name: api - Type: Instance - Protocol: HTTP/1.1 - Port: 30080 - HealthCheck Path: /healthz - Register target: None (to be set later in the Auto-Scaling Group) -
Target group for the web:
- Name: web
- Type: Instance
- Protocol: HTTP/1.1
- Port: 30081
- HealthCheck Path: /index.html
- Register target: None (to be set later in the Auto-Scaling Group)
Set the LB Target Groups in the Auto-Scaling Group
Ensure that the target group is automatically associated with the node lifecycle. Refer to the EC2 AutoScaling documentation for instructions on associating the Auto-Scaling group with the target group you just created.
Create an ALB
Next, follow the instructions in the ALB documentation to create an ALB. The target group you created above will be specified here. However, you can specify any target group since the modifications to the target group are made later in the Create ALB Listener Rules step.
Create ALB Listener Rules
-
Rule 1:
IF: - Host Header: ALB domain (or custom domain) - Path: /api/* THEN: - Authenticate: OIDC(*) - ForwardTo: {API target group} -
Rule 2:
IF: - Host Header: ALB domain (or custom domain) - Path: /* THEN: - Authenticate: OIDC(*) - ForwardTo: {WEB target group} -
Last(Default Action):
IF:
    - Requests otherwise not routed
THEN:
    - Return fixed response: 404
    - Content-Type: text/plain
    - Response body: Not found
(*) OIDC Configuration
- Prepare the following items required for OIDC integration in advance:
- Issuer
- Token Endpoint
- Userinfo Endpoint
- Client ID
- Client Secret
- You need to issue a ClientID/Secret at the IdP.
- The required RedirectURI is as follows for ALB:
https://{your-domain}/oauth2/idpresponse- Refer to the AWS documentation for more information.
Allow Communication from ALB to EKS
Finally, configure communication from ALB -> ( Target Group ) -> EKS.
- Allow communication from ALB to EKS via NodePort.
- Set the following inbound rule in the EKS cluster's security group:
- Type: CustomTCP
- Protocol: TCP
- Port Range:
30080 - 30081 - Source: The security group set in the ALB.
Deploy RISKEN
Connect to EKS with kubectl
- Update Kubeconfig for the newly created cluster:
$ aws eks --region ap-northeast-1 update-kubeconfig --name <cluster_name>
Deploy using Manifest files
-
Clone sample manifest :
$ git clone https://github.com/ca-risken/k8s-sample.git -
Copy the template for EKS:
$ cp -r overlays/eks-template overlays/eks -
Deploy the application using the Kustomize command:
$ kustomize build overlays/eks | kubectl apply -f - -
Wait for the Pods to have a status of
Running:$ kubectl get pod -A
Only some services are enabled by default
- The following services are not enabled by default because they require credentials at startup:
- Code
- Set the required parameters and update the number of Pod startups to
1or more in the Manifest file.- For details on parameters, refer to Parameters.
Delete Created Resources
Please delete the resources in the following order:
- EKS NodeGroup
- EKS Cluster
- ALB
- Target Group
- Security Group
- IAM Role